♥My Blinkies♥


♥I CT For♥

♥Forums♥


♥Blogs I Stalk♥


♥Fav Tube Sites♥


♥Fav Stores♥


Showing posts with label Foxy's Designz. Show all posts
Showing posts with label Foxy's Designz. Show all posts
Wednesday, 4 February 2015

~Supplies Needed~
I'm using PSP X2 but any should work
Tube + Scrapkit ~ Tube is by Spazzd Art & matching kit by Foxys Design. You need a licence to use Spazz's work & can get them here ~ Spazzd Art
Filters ~ Xero Porcelain & Radiance
Fonts ~ FFF Urban, Bambino
Mask ~ WSL_Mask297 here ~ weescotslass creations
~Lets Begin~
New raster layer 800x800
Paste Elem16 as new layer, move slightly over to left, with pick tool move slightly round to left, resize if needed. Duplicate mirror, merge down
Now click inside the Stars, expand 5, paste paper11 as new layer, invert delete. Paste Tube as new layer, resize to suit & place inside left Star, select none, duplicate tube & mirror, merge down. Xero Porcelain, Radiance - Beauty 150. Merge tubes down & change Blend Mode to Screen
Paste Elem20 as new layer, drag to bottom of palette, resize if needed
Paste Elem22 as new layer on right side, drag on top of Wire Elem, duplicate mirror, merge down
Paste Elem8 as new layer, resize mirror & move to right side, duplicate mirror, merge down
Paste Elem34 & 35 as new layers, resize 30% 80% & place on top of Black Leaves. I placed one of each on left then duplicated & mirrored, merge them down
Paste Elem6 as new layer, position on top of Flowers
Paste Elem17 as new layer, duplicate mirror, merge down, resize 80% & place on top of 'Sparkle' Elem
Paste Tube as new layer behind 'Sparkle', resize to suit, duplicate & change Blend Mode to Screen. Erase any parts below 'Sparkle'
Add drop shadow of choice to layers
Copy merged in to Anim Shop & resize 600 or whatever size you like, paste back in PSP & sharpen
Paste paper11 as new layer & apply mask, merge group, resize 70%, drag slightly over to left & flip, duplicate mirror & flip, drag slightly down, merge down
Add © & name & save as PNG!
I hope you enjoyed my Tutorial ♥
Wednesday, 24 December 2014

~Supplies Needed~
Tube ~ I'm using the awesome art work of PinUp Toons Package 208, Tube 208-1, which you need a licence to use & can get here ~CDO
Scrapkit ~ PinUp Toons Package 208 PTU by Foxys Desing here ~ CDO
Template ~ Temp299 by Kristin here ~ Toxic Desirez
Filters ~ Xero Radiance
Fonts ~ FFF Urban, Kewel
Mask of choice
Drop shadow of choice
~Lets Begin~
Open Temp299 & delete credit layer, resize canvas 850x850
Raster 7 ~ select all, float, defloat, paste paper9 as new layer, resize 80%, invert delete, invert modify expand 3, new layer & flood fill white, drag below, select none & delete orig layers. Do the same with copy of Raster 7
Do the same as above for the other layers - for Raster 4 i used paper4, Raster 6 i used paper10, Raster 5 i used paper1
Raster 3 ~ Select all, float, defloat & paste paper11, resize, invert delete, invert modify expand 3, flod fill whte drag below, select none, delete orig layer
Raster 2 ~ Select all, float, defloat, paste paper2 as new layer, resize 80%, invert delete, paste Tube as new layer, delete, Xero Radiance on tube, change Blend Mode to Luminance(L).Select none, click back on paper layer, select all, float, defloat, modify expand 3, new layer & flood fll white, drag below, select none & delete orig layer
Add rop shadow of choice to layers
Copy merged in to Anim Shop & resize, paste back in PSP & sharpen
Paste Elem5 as new layer on left & resize to suit
Paste Tube as new layer, resize 70% & place on right, Xero Radiance - Beauty 150
Paste Elem32 as new layer, resize 50% 70% & place on right side of Tree behind Tube
Paste Elem31 as new layer, resize 50% & place left side of Present
Paste Elm9 as new layer, resize 50% & place on left side
Paste Elem34 & 6 as new layers, resize & place behind Solider
Paste Elem16 as new layer, resize 50% 70% & place bottom right behind Tube, duplicate mirror flip & drag below Tree
Add drop shadow of choice to Elements
Now you can either add a paper or gradient of choice then apply mask
Add © & name then save as PNG!
I hope you enjyed my Tutorial

~Supplies Needed~
Tube ~ I'm using the awesome artwork of PinUp Toons Package 208, Tube 2, which you need a licence to use & can get here ~ CDO
Scrapkit ~ PinUp Toons Package 208 by Foxys Design here ~ CDO
Filters ~ Xero Radiance, Texture Effects-Mosaic Antique
Fonts ~ FFF Urban, Font of choice for name
~Lets Begin~
New raster layer 800x800
Paste Frame2 as new layer, resize 80%, click inside with magic wand, expand 10, paste paper10 as new layer, invert delete, paste Tube as new layer, resize if needed, delete, select none. Xero Radiance - Beauty 150,
Add drop shadow of choice to Frame
Paste Elem17 as new layer, resize to suit & place bottom of Frame
Paste Elem28 as new layer, on right, resize to suit
Paste Elem29, 31 & 23 as new layers, place on the seat & resize to suit
Paste Elem30 as new layer, resize 50% & place in front of Chair
Paste Elem25 as new layer, resize & place next to Blackboard
Paste Elem21 as new layer on right, duplicate & mirror, merge down, duplicate & move slightly up, drag below orig snow layer
Add drop shadow of choice to layers
Copy merged in to anim shop, resize & paste back in PSP, sharpen,
duplicate, Texture Effects - Mosaic Antique - hit ok, drag below orig tag
Add name & © then save as PNG!
I hope you enjoyed my Tutorial

~Supplies Needed~
Tube ~ I'm using the awesome artwork of PinUp Toons, Package 208 Tube 3, which you need a licence to use & can get here ~ CDO
Scrapkit ~ PinUp Toons Package 208 by Foxys Design here ~ CDO
Template ~ CDO Exclusive Mistletoe Template by Dee here ~ Dangerously Delicious Designz
Filters ~ Xero Radiance
Fonts ~ FFF Urban, AceBingham
~Lets Begin~
Open Temp CDO Exclusive, delete credit layer, green strip & small white squares. resize canvas 800x800
Tan Square ~ Select all, float, defloat paste paper9 as new layer.resize 80%, invert delete, invert modify expand 4, new layer & flood fill white, drag below select none, delete orig layer.Add some noise
White Oval ~ Select all, float, defloat, paste paper11 as new layer, resize 80%, invert delete, select none, delete orig layer
Red Circle ~ Select all, float, defloat, paste paper3 as new layer, resize 80%, invert delete, invert modify expand 3, new layer & flood fill white, drag below, select none, delete orig layer. Add some noise
Green Square ~ Select all, float, defloat, open paper8 & mirror, paste as new layer, resize 80%, invert delete, paste Tube as new layer, resize if needed, delete. Click back on Paper8 layer & invert modify expand by 3, new layer & flood fill white, drag below. Select none, delete orig layer & add some noise
Paste Elems 9, 23, 24 & 32as new layers, resize & place along bottom from left
Paste Elem16 as new layer, reize to suit & place top right, drag to bottom of palette, duplicate, mirror flip, merge down
Dotted Square ~ Adjust - Brightness & Contrast - B -255 C 0
Top Wordart layer ~ Select all, float, defloat, new layer & flood fill - #90c79f & #dc7369, select none, delete orig layer, now merge all 3 wordart layers down & resize to suit
Add drop shadow of choice to layers
Copy merged in to Anim Shop & resize, paste back in PSP, sharpen
Add name & © then save as PNG!
I hope you enjoyed my Tutorial ♥
Tuesday, 2 December 2014

~Supplies Needed~
Tube ~ I'm using the awesome artwork of Zlata_M, which you need a licence to use & can get here ~ Pics For Design
Scrapkit ~ Christmas Frost PTU by Foxys Design here ~ Digi Fox's Studio
Filters ~ Xero Radiance
Fonts ~ FFF Urban, Dominique
Mask of choice
~Lets Begin~
New raster layer 900x900
Paste Frame 2 as new layer, resize 80%, free rotate 90 degrees right, click inside with magic wand, modify expand 8 & paste paper 6 as new layer, resize 80%, invert delete. Paste large Tube as new layer, delete, select none. Xero Radiance - Beauty 150, Blend Mode - Overlay
Paste full Tube as new layer, resize 80% & place along bottom of Frame, duplicate, blend mode screen on top tube
Paste Elem 15 & 16 as new layers, resize 50% 70% 80% & starting with the blue move to left side of Frame then place white half on top, merge down, duplicate & move slightly over. Do this all the way along to right side of Frame
Paste Elem 8 as new layer, resize 50% & place on right side under flowers, duplicate & move slightly towards left, duplicate again & move slightly to left again, merge down, duplicate & mirror, merge down
Add a slight drop shadow to flowers & leaves
Paste Elem 31 as new layer, move to top of Frame & drag to bottom of palette above snowflake making sure you see some of the garland above frame, duplicate flip & move so its the same as at top, duplicate & 90 degrees left moving again if you have to, duplicate mirror, & move again if needed. I resized the left & right by 90%. Merge all 4 garlands down
Paste Elem 13, 27, 29, 42, 51 as new layers, resize to suit & place on right side in front of Tube. I mirrored Elem 13
Paste Elem 44 as new layer, resize to suit & place middle top of Frame
Add drop shadow of choice to layers
Copy merged in to Anim Shop & resize to suit, paste back in PSP & sharpen
Paste paper 6 as new layer & apply mask, merge group & flip
Add name & © then save as PNG!
Thursday, 6 November 2014
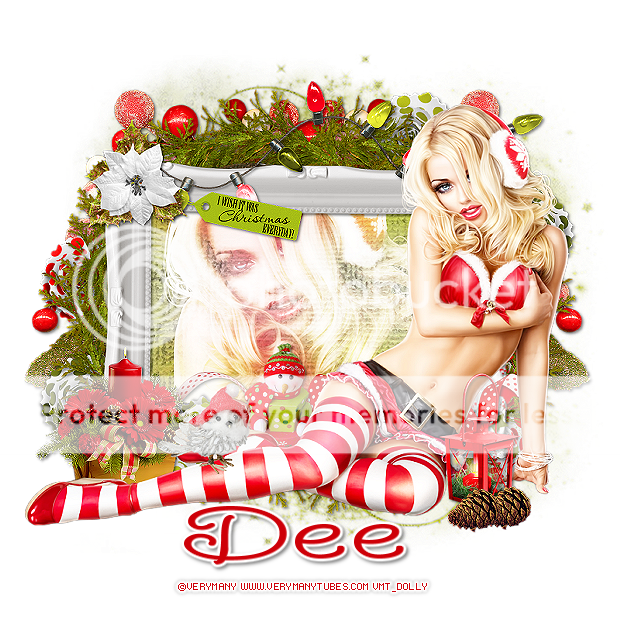
~Supplies Needed~
Tube ~ I'm using the awesome artwork of Verymany, which you need a licence to use & can get here ~ Verymany Tubes
Scrapkit ~ Christmas Cheer Collab PTU by Foxy & Dee here ~ Digi Foxy's Studio or Dees'Sign Depot For this tut I'm using Dee's part
Filters ~ Xero Radiance, Noise, drop shadow of choice
Font ~ FFF Urban, TwinkleStarROB
Mask of choice
~Lets Begin~
New raster layer 800x800
Paste Frame1b as new layer, resize 70%, click inside with magic wand, expand 7 & paste paper2 as new layer, resize 70%, invert delete. Paste close up of tube as new layer, resize if needed, delete, select none. Xero Radiance - Beauty 150
Paste Elem18 as new layer, drag below Frame & resize to suit so that its showing just above top of frame. Dupilcate mirror, merge down
Paste Elem's 26a, 26b &26 c as new layers, resize to suit & place around Frame drag them all behind, merge down & add drop shadow of choice
Paste Elem22 as new layer, resize to suit, so it fits along top of Frame, duplicate & change blend mode to screen on duplicated layer, merge down
Paste Elem3 as new layer along bottom of Frame, resize to suit, flip & drag back down
Paste Elem20 as new layer, resize to suit & place on left side of frame
Paste full tube as new layer, resize to suit, duplicate & change blend mode to screen on duplicated layer, merge down
Paste Elem11 as new layer, resize to suit & place behind Tube
Paste Elem1 as new layer, resize to suit & place on right side of tube
Paste Elem9 as new layer, resize to suit & place in front of Elem1, duplicate & move over slightly, merge down
Paste Elem34 as new layer, resize to suit & place top left of Frame, paste Elem15b as new layer, resize to suit & place on top of Elem34, merge down
Paste Elem6 as new layer, resize to suit & place left side on top of Tubes leg
Paste Elem12 as new layer, resize to suit & place under Elem on left side at top of frame
Once happy add drop shadow of choice to layers, then copy merged in to Anim Shop, resize 620 then paste back in PSP & sharpen
Paste paper3 as new layer & apply mask of choice
Add name & © then save as PNG!
I hope you enjoyed my Tutorial ♥

~Supplies Needed~
Tube ~ I'm using the awesome artwork of Keith Garvey, the tube I used is FTU & you don't need to use your licence but I always like to give credit. You can find the tube here ~ Garv Girls PSP Tubes
Scrapkit ~ Christmas Cheer Collab PTU by Foxy & Dee here ~ Digi Foxy's Studio or Dees'Sign Depot For this tut I'm using Foxy's part
Filters ~ Xero Radiance, Noise, drop shadow of choice
Font ~ FFF Urban, TwinkleStarROB
~Lets Begin~
New raster layer 800x800
Paste Frame 2 as new layer, resize 70%, click inside with magic wand, expand by 7. New layer & flood fill #38792a, paste paper5 as new layer, resize to suit, invert delete, select none, blend mode screen
Paste Elem13 as new layer on top of paper layer, erase any parts that are outside Frame
Paste Tube as new layer, duplicate & drag below Frame. Hide top tube for now. On bottom tube erase any parts that hang below frame, now hide this tube. UNhide top tube & erase parts that are on top of frame at bottom. So it should now look like tube is coming out of frame. Add Xero radiance - Beauty 100 on both tubes & drop shadow of choice to bottom tube
Add drop shadow of choice to Frame
Paste Elem16 as new layer, resize to suit making sure its centre along bottom of frame
Paste Elem12 on left side of tag on bottom, resize to suit, once happy duplicate & mirror. Do the same with Elem35. Merge them down. Then paste Elem32 on left side & Elem21 on right side. See mine for placement
Paste Elem15 as new layer, resize to suit & place left side of frame above other elements, duplicate mirror, merge down
Paste Elem13 again on top of tube, position & once happy delete any parts that are on bg layer
Now merge visible, duplicate & on orig layer - Texture Effects-Mosaic Antique with orig settings, if needed resize 9o-95% just so you can see it round edges
Paste Elem8 as new layer on top of Mosaic layer, resize to suit & move to right, duplicate mirror, merge down, duplicate flip, merge down add small white drop shadow
*For the above step I added a black layer to bottom of tag so I could see what I was doing then delete once I was happy*
Add drop shadow of choice to rest of layers
Copy merged in to anim shop & resize 620, paste back in PSP & sharpen
Crop tag and add name & © then save as PNG!
I hope you enjoyed my Tutorial ♥
Saturday, 1 November 2014

~Supplies Needed~
Tube ~ I'm using the awesome artwork of Maryline Cazenave, which you need a licence to use & can get here ~ CDO
Scrapkit ~ Sparkle Forever PTU by Foxys Designz here ~ Digi Foxy's Studio ~ This is a huge collab kit to honor Foxy's neice ♥
Template ~ Temp21 by TwyztedT here ~ TwyztedT's Playroom
Filters ~ Xero Porcelain, Noise
Fonts ~ FFF Urban, Big Flirt
Mask of choice
~Lets Begin~
Open Temp21 & delete copyright layer, resize 800x700
Black Square ~ Select all,float, defloat & paste paper14 as new layer, resize 70%, invert delete, invert modify expand 3, new layer & flood fill white, drag below paper layer, select none, delete orig layer
Grey Circles ~ Select all, float, defloat, paste paper1 as new layer, resize 70%, invert delete, invert modify expand 3, new layer & flood fill white, drag below paper layer, select none, delete orig layer
Dark Grey Square ~ Select all, float, defloat, paste paper 10 as new layer, resize 70% 80%, invert delete, paste Tube as new layer, resize if needed, delete, select none. Do the same with Light Grey Square but paste paper11. Delete orig layers. Xero Porcelain on Tubes
Glitter Grey Rect ~ Adjust-Brightness & Contrast - B -255 C 0. add some noise
Light Grey Rect ~ Paste elemt27 as new layer, delete orig layer
Left Side Stars ~ Light Grey - Select all float, defloat, new layer & flood fill #c1135b, expand 2, new layer & flood fill white, drag below, select none. Do the same with smaller star make black, add some noise. Delete orig layers. Do the same with the Right side stars but make bigger black & smaller pink
Add some noise to white backgrounds
Paste Elem18 as new layer on top of Pink paper layer, resize to suit
Paste Elem4 as new layer, resize to suit & place left end of Sparkle Forever Elem
Paste Pink Balloon as new layer on left behind Crown elem, resize to suit. I add same Porcelain as on Tubes
Paste Elem42 as new layer, resize 50% & place on left Tube
Copy merged in to Anim Shop, resize to suit, paste back in PSP & sharpen
Paste Tube as new layer on right, resize to suit
Apply Mask of choice
Add name & © then save as PNG!
Saturday, 27 September 2014

~Supplies Needed~
Scrapkit ~ Halloween Little Monsters PTU by Foxys Designz here ~ CDO
Template ~ Temp21 here ~ Dangerously Delicious Designz.
Fonts ~ FFF Urban, 2peasDude
Mask ~ Vix_BigMask 1 ~ Vix PSP
~Lets Begin~
Open Temp21 & delete credit, Wordart & Haunted House layers
Paste the House in the kit as new layer where the Haunted House was, resize to suit. Add a fat white gradient glow then add this drop shadow - 5, 5, 50, 5 , #815f7d. Then do the same again with -5, -5, 50, 5, #815f7d
Left Purple Rect ~ Select all, float, defloat, paste paper 4 as new layer, resize 70% 80%, invert delete, select none. Duplicate mirror, move up above Right Purple Rect. Delete orig layers
Left Orange Circle ~ Select all, float, defloat, paste paper 9 as new layer, resize 70% 80%, invert delete, select none. Duplicate mirror, move up above Right Orange Circle. Delete orig layers
Do the same as above with the Teal Circles & paper 3
Green Rounded Rect ~ Select all, float, defloat, paste paper 8 as new layer, resize 70% 80%, invert delete, select none. Delete orig layer
Thin Purple Rect ~ Select all, float, defloat, paste paper 6 as new layer, resize 80%, invert delete, invert expand 3, new layer & flood fill black, drag below, select none
Do the same with the Thin Green Rect but use paper 1 & flood fill background layer #815f7d
Add drop shadow of choice to layers
Black Dotted layer ~ Adjust - Brightness & Contrast - B 255, C 0
Paste Elem13 as new layer, resize 70% 80% & place on top of Orange Paper layer on left add a fat white gradient glow then the same purple drop shadow as the House. Do the same with the Mummy on top of the Right Orange paper
Paste Elem7 as new layer on top of Blue Paper
Paste Elem14 as new layer, resize 70% 80%, add same glow & drop shadow we did for House
Paste Lamp Post as new layer, resize 80% & move to right side, add same purple drop shadow
Paste Cat as new layer, mirror, resize 70% 80% & place on right side, add same purple drop shadow. Do the same with Pumpkin
Paste Elem10 as new layer, resize to suit & place top left, with pick tool move it slightly round to left, same purple drop shadow
Paste Elem19 & 3 as new layers, resize to suit & place on left, purple drop shadow again
Copy merged in to Anim shop & resize 620, paste back in PSP & sharpen
Add new layer under tag & flood fill #c5ce5b, apply mask, merge group
Add © & name then save as PNG!
I hope you enjoyed my Tutorial ♥
Sunday, 24 August 2014

~Supplies Needed~
Im using PSPX but any version will work
Tube ~ Im using the awesome artwork of Alfadesire which you need a licence to use & can get here ~ Pics For Design
Scrapkit ~ IB-MollyHarrison-94-3 PTU by Foxys Designz here ~ CDO Store
Fonts ~ FFF Urban. CurlySue
Mask ~ WSL_Mask12 ~ weescotslass creatons
~Lets Begin~
New raster layer 850x850
Paste Frame 2 as new layer, resize 70%, paste paper 1 as new layer, resize 70% & drag below Frame, erase any parts of paper that hang ut of Frame
Paste Tube as new layer, drag below frame, resize if needed & erase any parts that hang below Frame
Paste Tube again, resize to suit & place on right of canvas, duplicate, blend mode screen on duplicate, merge down
Paste Elem19 as new layer, resize to suit & drag below Tube
Paste Elem14 as new layer, resize to sut & place along Fence
Paste Elem10 as new layer, resize t suit & place on left at beginning of Fence, duplicate mirror, drag back along beside orig, merge down, duplicate mirror, drag back along beside orig, merge down
Paste Elem20 as new layer, resize to suit & place inbetween first mered leaves, duplicate & move to next merged leaves
Paste Elem6 as new layer, resize 80% & place behind Fence
Paste Crow as new layer, resize to suit & place on left side branch on Tree
Paste Elem16 as new layer, resize to sit. Using pick tool move t slightly round to right. Place it over Crow's hand, duplicate & drag below Crow. Now back on top 'Boo!' and erase part at top of hand. It should now look like the Crow is holding the Boo! sign
Paste Elem2 as new layer, resize to suit & place on left
Add drop shadow of choice to layers
Paste Paper6 as new layer at bottom of palette
Apply WSL_Mask12, merge group, resize 80% & move along to left slightly, duplicate mirror & move along to right slightly to right if needed, merge down
Copy merged into Anim Shop & resize 620, paste back in PSP & sharpen
Add name & © then save as PNG!
I hope you enjoyed my Tutorial ♥
Saturday, 2 August 2014

~Supplies Needed~
Tube ~ I'm using the awesome artwork of Wendy Gerber, which you need a licence to use & can get here ~ Mystical Scraps *I purchased this tube from SATC*
Scrapkit ~ Poison PTU by Foxy's Designz here ~ Mystical Scraps
Fonts ~ FFF Urban.
~Lets Begin~
New raster layer 851x315
Paste paper1 as new layer, resize 110
Paste Tube as new layer, resize to suit, duplicate & screen on top tube, merge down
Paste Elem16, free rotate 90 to right, resize to suit. Paste tube again behind each frame, resize & once happy delete any parts of tube outside frames, screen again on both tubes
Paste Elem18 as new layer, resize to suit & place on left, duplicate, resize 70%, & move slightly, merge down, duplicate mirror
Paste Elem7 as new layer, free rotate 90 left, place behind tube on left, duplicate mirror, merge down
Paste Skull as new layer, resize so it sits on large bin on left, duplicate, resize 80% mirror & drag back along to other Skull, merge down
Paste Crow as new layer, resize to suit & place on smaller bin on right
Paste Elem3 as new layer, resize so it sits on smaller bin on left, duplicate mirror, drag back beside orig, duplicate orig again & mirror, place on top of larger bin, merge left side flowers down
Paste Elem4 as new layer, resize 70% & place on left behind Tube, duplicate mirror, merge down
Highlight paper layer & crop tag, select all, select selection borders 4, new layer & flood fill with colour or gradient of choice, add some noise, select none then add fat white gradient glow
Add drop shadow of choice to layers
Add name & © then save as PNG!
I hope you enjoyed my Tutorial ♥
Friday, 4 July 2014

~Supplies Needed~
Tube ~ I'm using the awesome artwork of Zindy S. D. Nielsen which you need a licence for & can get here ~ Zindy Zone Shop
Scrapkit ~ Fairy Dust PTU Exclusive to Mystical Scraps here ~ Foxy's Designz
Filters ~ Xero Radiance
Fonts ~ FFF Urban, Allura
Mask ~ WSL_Mask39 here ~ weescotslass creations Links are down right side
~Lets Begin~
New raster layer 800x800
Paste Frame1 as new layer, resize 70%, Free Rotate 20 left, click inside with wand, expand 5, paste paper1 as new layer, resize 70%, invert delete, drag below. Paste tube as new layer, resize to suit, delete, select none, drag tube below frame. Xero Radiance - Beauty 150 on tube. Add drop shadw to Frame, merge down on to one layer
Duplicate merged layer & mirror, merge down
Paste Tube as new layer, resize to suit & same Xero Radiance & drop shadow
Paste Elem29 as new layer, resize 70% & place behind Tube
Paste Elem1 as new layer, resize to suit & place in front of Tube
Paste Elem17 as new layer, free rotate 90 to right resize 80% twice, duplicate mirror & merge down. Place on top of Ribbon
Paste Elem8 as new layer, resize to suit, free rotate 90 right & place behind merge flower, duplicate & mirror, merge down
Merge Flower & leaves down, resize 90% & move slightly down
Paste Elem26 as new layer, resize 80% & place on top of tube in right frame, duplicate & mirror
Paste Paper7 as new layer at bottom of palette & apply Mask, merge group
Add drop shadow to layers
Copy merged in to Anim Shop, resize 620 & paste back in PSP, sharpen
Add name & © then save as PNG!
i hope you enjoyed my tutorial ♥
Friday, 27 June 2014

~Supplies Needed~
Tube ~ I'm using the awesome artwork of Alex Prihodko which you need a licence for & can get here ~ Pics For Design
Scrapkit ~ IB_TedHammond_63-1 PTU by Foxy's Designz here ~ CDO
Fonts ~ FFF Urban, BikerFromHell
Mask ~ WSL_Mask39 ~ weescotslass creations ~ Links are down the right side
Drop Shadow of choice
~Lets Begin~
New raster layer 800x800
Paste paper5 as new layer & apply mask
Paste Elem19 as new layer, resize to suit
Paste Tube as new layer, resize to suit & move slightly on right side, duplicate & on top layer change blend mode to screen, add drop shadow of choice to bottom Tube
Paste Elem18 on top of Paper layer, resize to suit
Paste Elem11 as new layer in front of Elem19, resize to suit
Paste Elem3, Elem7, Elem5 & Elem10 as new layer, resize & place on left side, once happy merge down
Paste Elem2 as new layer, resize 70% & place behind above Elements but in front of Tube
Paste Elem4 as new layer behind Skull, Hat etc on left, resize to suit
Add drop shadow of choice to rest of layers
Copy merged in to Anim Shop & resize 650, paste back in PSP & crop any extra canvas & sharpen
Add name & © then save as PNG!
I hope you enjoyed my Tutorial ♥
Monday, 16 June 2014

~Supplies Needed~
Tube ~ I'm using the awesome artwork of Keith Garvey which you need a licence to use & can get here ~ Garv Girls PSP Tubes
Scrapkit ~ IB Ted Hammond 31-3 PTU by Foxy's Designz here ~ CDO
Fonts ~ Oh La La, Secret Recipe
Mask ~ WSL_MASK12 ~ weescotslass creations - Links are on right side
Drop shadow of choice
~Lets Begin~
New raster layer 800x800
Paste Frame3 as new layer, resize 70% & move slightly up
Click inside frame with magic wand, expand 6 & paste paper as new layer, resize 70%, invert delete & drag below, select none
Paste Tube as new layer, resize if needed, duplicate & drag below Frame. Now erase any parts that hang below frame. Xero Radiance on both tubes Beauty 150, drop shadow on bottom Tube & Frame
Flowers (Elems 10, 11, 12) ~ Paste each flower as new layer & resize to suit & place on left side, once happy duplicate & mirror, merge down
Paste Elem14 as new layer resize so it fits on top of flowers
Paste Elem5 as new layer, resize to suit & place n middle of Flowers
Paste Elem19 as new layer, resize to suit & drag to bottom, duplicate mirror, merge down then flip
Paste Elem3 as new layer at bottom, resized it by 150% then applied Mask, merge group & resize if needed
Add drop shadow of choice to rest of layers & crop
Copy merged in to Anim Shop & resize to suit, paste back in PSP & sharpen
Add name & © then save as PNG!
I hope you enjoyed my Tutorial ♥
Subscribe to:
Posts
(Atom)